Table of Contents
UPDATE 2019-12-08: I’ve improved the python script and modified the pin numbers, so some of the comments here are outdated. Please check directly at github.com/ctrlw/magni
This post explains how to build a simple video magnifier with Raspberry Pi and camera models from 2018.
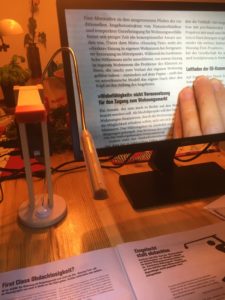
A video magnifier is a combination of screen and camera, that captures objects like books or letters and displays them on the screen, scaling the objects to a bigger and thus more readable size. This is useful for people with bad eyesight, e.g. elderly people suffering from macular degeneration. The setup described here uses only digital zoom with a fixed focus, which limits its useful scaling to something between a factor 2 and 10.
Commercial video magnifiers have many more features, including different view modes, higher scale factors, an easily movable table surface, sturdy construction, and finally clinical device status that may make the health insurance pay for it. If these things don’t matter for you, this tutorial lets you build a simple video magnifier for some 100-300 Euros (depending on whether you already have a screen and other materials). If you do need a professional device but don’t want to pay full price, check ebay for a second hand device. Or check what others have done:
- Cool Raspi soldering microscope including Wifi image: www.instructables.com/id/Raspberry-Pi-Zero-HDMIWiFi-Soldering-Microscope/
- Magnifier with borehole camera and old laptop: www.instructables.com/id/Reading-Aid-for-the-Partially-Sighted
- EVidMag: magnifier software for Raspberry Pi combined with document cameras: github.com/mikeh69/EVidMag
Compared to my first video magnifier, image quality has improved due to the better camera, and the new script allows simple switching between different scaling modes.
Some advantages of the new setup:
- simple switching between magnification modes (via button or keys)
- better camera (8 MP instead of 5 MP, better low-light handling)
- optional colour inversion (white text on black background)
- faster bootup
- change the focus with a small included tool, no need for a cutter anymore (I killed one of the old cameras this way)
- (more) portable
For the physical construction I describe 2 different setups, but I’m still experimenting with designs and encourage you to try your own. And if so, please let me know about it 🙂
Ingredients
| Ingredient | Price (EUR) | Comments |
|---|---|---|
| Raspberry Pi 3 B+ | 39 | |
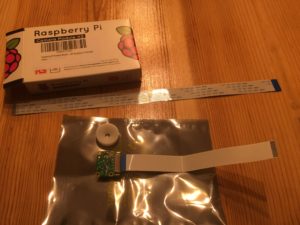
| Raspberry Pi camera V2.1 | 22 | |
| microSD card 16 GB | 9 | |
| micro USB charger 3 A | 9 | or with switch |
| HDMI cable | 6 | |
| Monitor with HDMI input | ~100 | |
| Mount (wood, case, 3d printed pieces, ...) | ? |
I strongly suggest to use the Raspberry Pi camera v2, as image quality is better than with v1, and you can easily adjust the focus without risking to break your camera. But if you take the risk and want to save some bucks, the old model will do as well.
You really don’t need the latest Raspberry Pi 3 B+, any model is fine. The older models let you save money and power (which again saves money, even on the charger). Computation is mostly done on the camera, so the only advantage of a faster Raspberry Pi may be a shorter boot time. However, if you want to use a Pi Zero take care of the different connectors (even for the camera).
The SD card won’t matter much, as long as it’s at least 2 GB (I’ve only tried 4 GB and up). Having a fast one (class 10) will make you wait less during installation, and probably also on bootup. Remember that old Raspberry Pis use standard SD format, while the newer ones have microSD.
For the monitor I used a BenQ screen with a VA panel, because it’s cheap and has some features to make it nicer on the eyes: VA, non-flickering, and blue-light reduction. You can also attach the device to an existing TV with HDMI input, e.g. by using an HDMI switch. However, the screen may stay dark if the Raspberry Pi is not the active source at boot time.
Additional ingredients are needed depending on the mount and are listed there.
Helpers
- (micro)SD Card reader
- USB keyboard and mouse
Setup
- Download Raspbian Stretch Lite and install on SD card
- Connect camera
- Login with default user “pi”, password “raspberry” (if on desktop, open a terminal)
sudo raspi-config- Interfacing options -> Enable camera
- Boot options -> Desktop / CLI -> Console Autologin
- Network options -> Setup Wifi (unless you connect by cable)
- Save and reboot
- After reboot, you should be in the terminal already
sudo apt-get updatesudo apt-get upgradesudo apt-get install python-rpi.gpio python3-rpi.gpio
The last line is needed to access GPIO pins in python. You could skip this if you don’t intend to add a push button at GPIO, but then you’d also have to adapt the python script, so just leave it there 😉
Make it a magnifier
- Check that the camera works:
raspivid -f -rot 180- If you see the current camera view for a few seconds, and the view is at the same angle that you have from above (e.g. it’s not upside down), you’re good
- You may want to adjust the focus (now, or later when the mount is ready), simply turning the lens with the plastic “wheel” that comes with the Pi camera v2
- Download the file magni.py from github:
wget https://github.com/ctrlw/magni/raw/master/magni.pychmod +x magni.py- Check that script works
./magni.py- You should see the area below your camera
- Pressing enter should change the magnification
- If everything is ok, hit Esc and continue
Quietly boot into the magnifier
Now let’s clear the login messages for a clean background, and automatically start our script after booting. Therefore, edit .bashrc which is executed after each login
nano .bashrc- Append the following two lines at the end of the file
clear./magni.py- Leave nano with Ctrl-x, press “y” to save and enter to update the given file.
- To avoid the messages during startup, edit /boot/cmdline.txt
sudo nano /boot/cmdline.txt- Append the following at the end of the line and save the file
logo.nologo quiet splash
While researching, I came across lots of outdated or misleading info on splash screens and removing messages in Raspberry Pi. This instruction was inspired by a comment in the article www.raspberrypi.org/blog/introducing-pixel/ which is among the more useful, although I didn’t make the splash screen work.
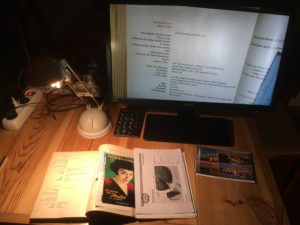
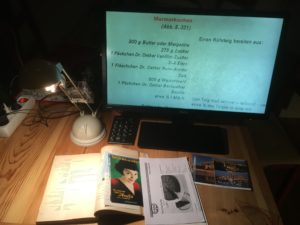
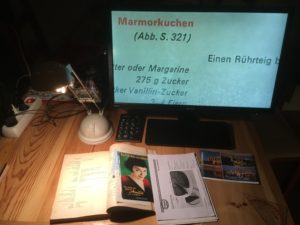
Building a mount
Time to get creative. So far we’ve setup the system, but it’s missing a mount. Here are two prototypes, the first (“lamp magnifier”) being simple and hacky, and it shows. The second (“flexible arm”) looks better and can be easily adapted, but was considerably more work.
The magni.py script reacts to input both from a push button or from a keyboard. I used a numeric keypad with the lamp magnifier, and a push button for the flexible arm. Of course this can be exchanged, combined, or even not be used at all (in that case the device would always stay at default magnification).
For both setups, it makes sense to use a switchable multiple socket-outlet and plug in the Raspberry Pi charger, screen and lamp if needed, so they can all be switched on / off together.
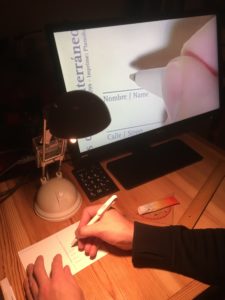
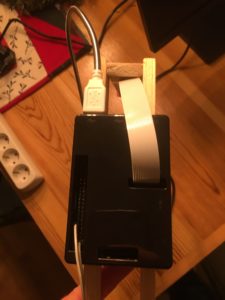
1. Lamp magnifier
Ingredients
- Raspberry Pi case (had a Raspberry Pi 1 with official case)
- Lamp (had a basic halogen lamp from the hardware store)
- Numeric keypad
- Wooden peg with a bit of rubber gum inside
- Twist tie (to attach the case to the lamp)
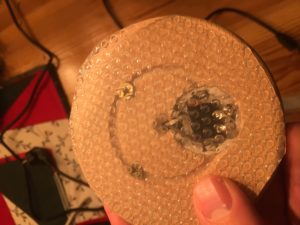
- Cardboard to “protect” the camera (3d printer anyone?)
There’s really nothing to it. Very simple to “build”. Not exactly stable.
Usage: Pressing a digit on the numeric keypad switches magnification to that factor (except for too small values). Pressing the Enter key switches to next preset magnification level. Pressing “/” even inverses colours (some people are better reading white text on black background). This is not exclusive to this build, of course the keypad can also be attached to the other version.
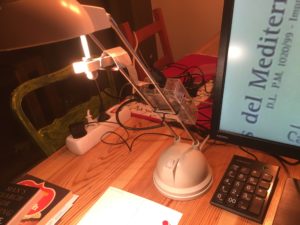
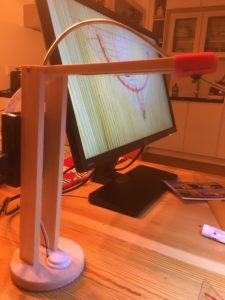
2. Flexible arm magnifier
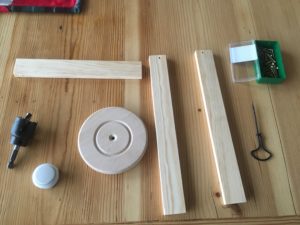
Ingredients
- Raspberry Pi case with holes for GPIO cables
- USB LED lamp
- Wood (3cm x 1cm, 2 * 25cm, 1 * 20cm)
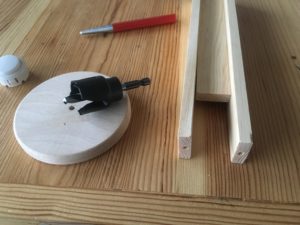
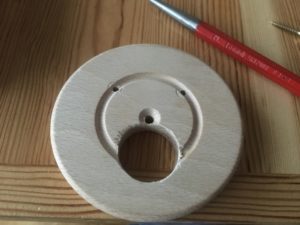
- Wooden wheel (10cm diameter, 1.5cm thick or more)
- Screws (4 * 2 cm to fix arm and Raspberry Pi, 2 * 4cm to fix bottom)
- Flex band 30cm for Raspberry Pi camera (or 50 cm if you make it bigger)
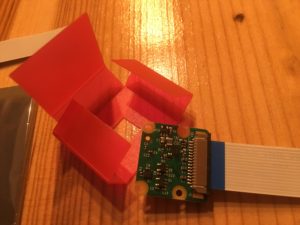
- Plastic to fold the camera case
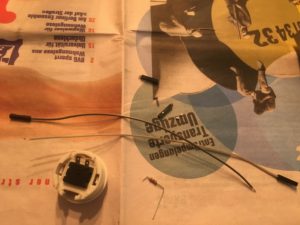
- 2 jumper cables, 1 resistor (used 1k Ohm)
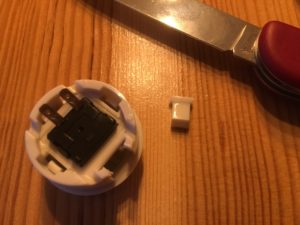
- 1 push button (3cm, taken from arcade joystick set)
- Rubber to keep it in place and protect push button electronics
- Tools: saw (Japan saws are great!), 2-3mm drill for pre-drilling the screws, 3cm drill for drilling the button hole, screwdriver, soldering equipment, cardboard cutter, glue
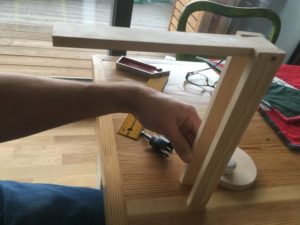
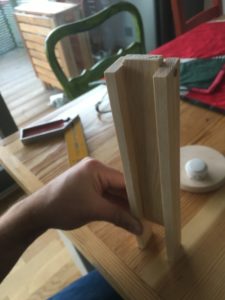
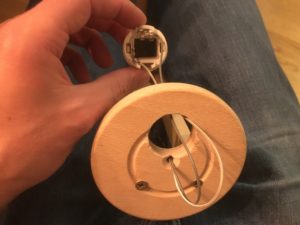
This can be folded together for transport, the single button makes it easy to use, and you can move the arm up and down to see more / less (e.g. slightly move upwards for a big newspaper).
Below is a kind of step-by-step photo story. The screws for the case are about 15cm above the top of the base.
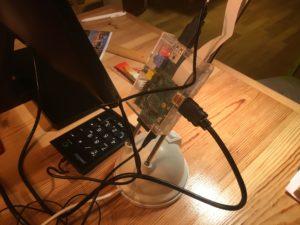
The jumper cables are attached to GPIO pins 1 and 10 (when counting them through, i.e. 1 being the 3.3 V connector on the left and 10 a GPIO pin on the right) UPDATE 2019-12-08: the updated script uses now pins 7 and 9, i.e. the 4th pin on the left side and the neighbouring GND. I had to bend the push button connectors and break off one of its plastic pieces. Also cut one side of the jumper cables to solder to the button / resistor.
For the push-button I mostly followed raspberrypihq.com/use-a-push-button-with-raspberry-pi-gpio, and avoiding multiple click events with bounce time was a helpful addition from www.raspberrypi.org/forums/viewtopic.php?t=146369
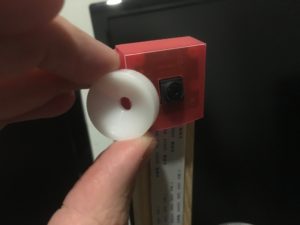
The “case” for the camera is cut and glued from plastic and about 3cm x 3cm, with a height of 1.3cm, basically the wood plus about 3mm. The camera lens watches through an 8mm square. Should get it 3d printed some day.


Adapt
Now that everything is in place, adjust the focus till a letter under the camera looks sharp. Then try a book and maybe adjust. Not all objects are flat. If you’re smart you got a Raspberry Pi camera v2 and do it the easy way, just turning the white ring tool. If not, follow the steps under “Prepare camera” on my old magnifier and good luck!
Now you can also adapt the magni.py script if you care. With a ruler under the camera and another ruler on the screen, you can measure the magnification factor after booting. If 1cm appears 2.5cm on the screen, you’re done, otherwise change the DEFAULT_FACTOR to the value you measured.
Adapt SCALE_FACTORS, if you want to change the possible steps you cycle through when pressing the push button or Enter, e.g. to adapt to the most often used objects and their ideal magnification. And if in your life there’s only a single scale factor you ever need, let’s say pi, then forget about buttons and keypads and just set SCALE_FACTORS = [3.14159265359].
If you do use the push button, but for some reason don’t want it at the pin 10 but somewhere else, just adapt PIN_NUMBER.
You can change RASPIVID to modify or add other command line options, e.g. the camera rotation (“-rot”) that is currently set to 180, but would also accept 0, 90 or 270.
While experimenting, just change magni.py and start it from the command line. The escape key gets you out again. Or if you’re missing something, let me know and I’ll see what’s possible.
Support hard shutdown (power off)
In regular use, it shouldn’t be necessary to do an orderly shutdown like sudo halt each time before powering off. However, simply cutting power may corrupt the sd card at some point. So let’s make the system read-only, which allows to unplug the Raspberry Pi without negative consequences.
This should be the last step, so if you still want to play around with the setup to modify stuff or change the default magnification, better wait with the following steps.
wget https://github.com/adafruit/Raspberry-Pi-Installer-Scripts/raw/master/read-only-fs.shsudo bash read-only-fs.sh- The script asks a couple of questions:
- Continue? y
- Enable boot-time read/write jumper? N
- Install GPIO-halt utility? N
- Enable kernel panic watchdog? N
- CONTINUE? y
You find more background on the read-only script at learn.adafruit.com/read-only-raspberry-pi/ or www.raspberrypi.org/blog/adafruits-read-only/
Content of magni.py
The magnification code is on github. It’s 150 lines, commented and pretty self-explaining. But that’s what everyone thinks about their code they just wrote.
It basically loads raspivid in the background, listens to key press or GPIO push button events, on which it terminates raspivid to restart it with different parameters. Zooming happens with the “-roi” parameter, which defines a subset of the camera view that is shown on the screen. This works like a digital zoom, so the higher the zoom factor, the blurrier your image. Factor 10 still looks ok to me in this setup. If you usually need higher factors, build a smaller mount (i.e. place the camera closer to its target) and adjust the lens. Or aim for a professional device or camera with optical zoom.
Considerations
Some security measures may be needed when the device is used in a (semi-) public space, e.g. switching off Wifi and changing the password. And there are some drawbacks compared to professional devices:
- It’s not a medical device: it’s not tested for medical use and lacks the robustness, security and reliability of such devices
- Fixed magnification steps: the user can only change magnification for fixed scale factors, not scale smoothly. This is also an advantage, so it can be optimised for the usual use-cases and won’t change by accident
- No special view modes except colour-inversion
- No easy handling of the source, e.g. to help move around a book
- The LED may not give enough light
Thanks for reading till here. If this was useful or you have questions, please comment here or drop me a line at info@fhack.org.
Awesome work! I like the final design with the folding arm, you could even attach a rechargeable battery pack so you would not need to carry a power adaptor when transporting.
Thanks! The battery pack is a good idea and would make special sense for a setup that sends the image over wifi, as described here: https://www.instructables.com/id/Raspberry-Pi-Zero-HDMIWiFi-Soldering-Microscope/
Thanks for the write up. I took your idea and modified it a little bit for my aunt.
I wasn’t happy with the digital zoom (it gets kind of fuzzy), so I added a few holes on the vertical arms. I then got together with my aunt and lowered the horizontal arm (and adjusted the focus on the pi camera) so the native image was zoomed enough for her, with the arm in an horizontal position.
I also added a second button. One cycles between normal and colour inversion. The other turns the Raspberry Pi on/off.
Thanks for letting me know! Do you have pictures or more info on your setup?
Did you make the holes so that you can adjust to a single best setting for your aunt, or can you actually switch?
I always wonder if one setting is enough for a single user, or if there should be a few presets for the most common sources like a photo, book, letter, newspaper, medicine, …
Great tutorial! I made a case for the camera using 3D printer files from a tutorial at https://www.instructables.com/id/Tripod-Camera-Mount-for-Raspberry-Pi/ – I used a photopolymerized resin that is too brittle to tap threads into, so I just put a hex nut in the slot in the tripod mount and used a screw to mount the camera case to the lampshade of a desk lamp with a LED bulb. I edited the magni.py script so the magnifier cycles through magnifications of 1.25x, 2.5x and 5x – the 10x setting seemed too fuzzy with my (v1.0) camera.
Cool, thanks for the feedback! Do you mind sharing a photo of your setup?
I am very interested in this magnifier project. Do you know what the maximum magnification that is possible?
As I read this I understand it is possible to set the PI up to simply work using an on/off switch. Is that correct or did I miss something important. I am considering this for an 91 year old uncle with no computer skills and macular degeneration.
I would appreciate any response.
Thank you for all the details.
Lee
Hi Lee,
The maximum magnification depends mostly on the camera resolution and the size of the attached monitor. With a v2 camera, it’s getting noisy when going above a factor 10 magnification.
The device powers up when it has electricity, so if you intend to have this as a dedicated device with its own monitor, best is to plug both into a switchable power strip. It can be safely shut down by switching off the plug, as the SD card is set to read-only.
However, the Raspberry Pi takes almost 1 minute to boot up into the camera view, so some people suggest to just keep it running, as the Raspberry Pi does not use much electricity.
You can follow the description here, but if you want to use push-buttons it’s better to wait a few days, as I plan to post an update with some improvements. Also I haven’t tested it with the latest Raspbian yet.
I will wait for your update. I just ordered a camera today. Plan is to have something up and working before Christmas.
I’ve upated the script at https://github.com/ctrlw/magni, adapted the GPIO pin numbers in this text and checked that everything works with latest Raspbian Buster, so you should be good to go now.
Hello Markus. I’d like to thank you for posting this. Just finished my own version of the magnifier based on your well written post for my grandma. it turned out rather well – used a small four legged table/tray to mount the cam/led ring and made a 3d-printed pi-case attached on the back of the monitor – so it looks all nice and tidy. I am very pleased and surprised by the usefulness of the device – and it’s all thanks to you who made an effort. Kudos! Martin.
Hi Martin, thanks for the comment and glad it’s useful for your grandma.
I’m always interested to see a picture of the builds, so if you don’t mind it would be great to upload a photo, ideally at the project page on https://github.com/ctrlw/magni/discussions , or at the raspberry pi forum https://www.raspberrypi.org/forums/viewtopic.php?f=102&t=229429 or here.
I built something very similar for my 89-year-old father-in-law.
To let him easily change magnification I added a KY-040 rotary encoder.
I found the Raspberry Pi Camera Module 3’s autofocus function was acting erratic when constantly active, so I turned it off. Instead, he can press the encoder button to trigger a single autofocus. He has been using the setup without a keyboard or mouse for more than a year.
The prices of commercial reading aids are just outrageous.
Hi Martin, thanks for your comment.
I’m very interested in your setup, can you share how you connect and read from the encoder?
Regarding the autofocus, I had the same experience, sometimes it worked fine and sometimes it would actually move a perfectly fine setup out of focus.